Zane, Sierra, Devin, Monique, and Will.

The weather station was really on down a few days and has been back up since December of 2014.
We moved into Riverwalk Estates in November. It is a community with a HOA, so I had to put it up within the rules here. Luckily, flagpole are allowed and I was given permission to install the weather station on top of the flagpole instead of the usual ball or eagle.
The weather station has been taken off line. We are in the process of moving and it will be a month or so before it goes up at the new location.
The station was moved to a Mac and now runs WeatherCat.
Sometime near the end of September 2014, I will be moving from Glendale to Laveen. The weather station is likely to be off-line for a week or two. It will also get renamed and get a new Weather Underground name and station number as it will no longer be collecting data in Glendale AZ.
This weather station uses Vantage Vue weather monitoring hardware, a Raspberry Pi computer and Weewx weather software. The station measures the weather conditions, the computer and software work together to get the data off the console, store it, and upload it to a website and to Weather Underground.
The Vantage Vue

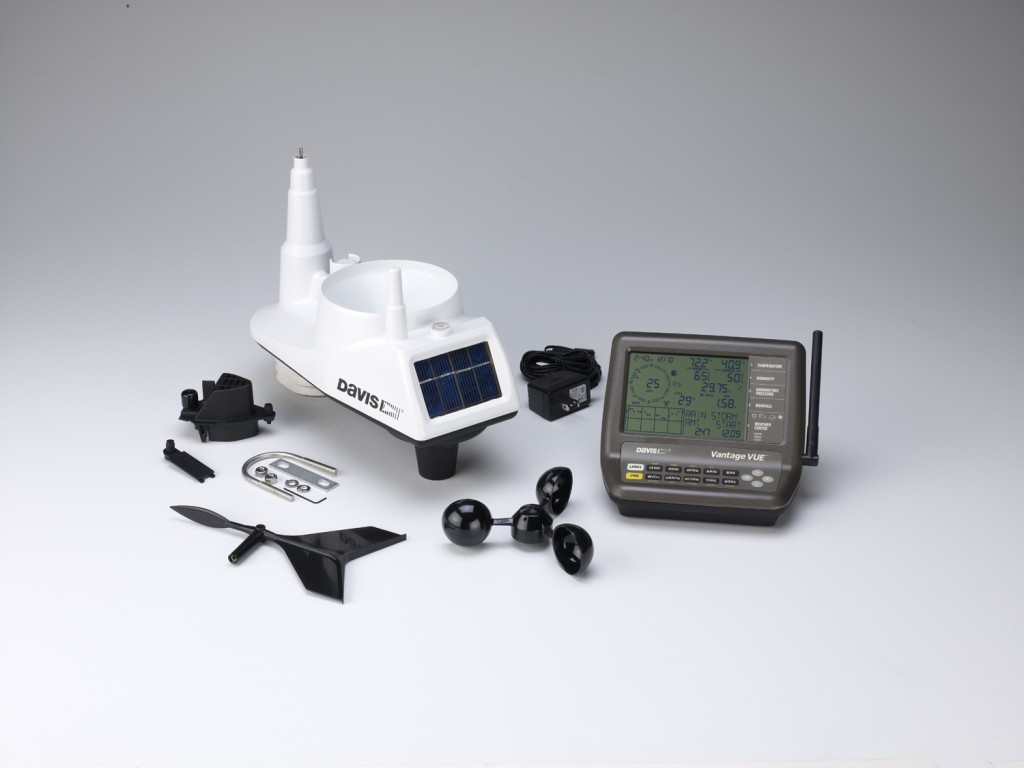
What you get with the Vantage Vue. The sensor cluster, a bit of mounting hardware, and the weather console.
The Vantage Vue is an entry level weather station made by Davis. It uses an all-in-one sensor cluster that monitors wind direction, wind speed, rain fall, air temperature, and air pressure. It has a solar panel that generates all the power it needs. During the day, the solar panel charges a battery so that it has power over night and on overcast days.

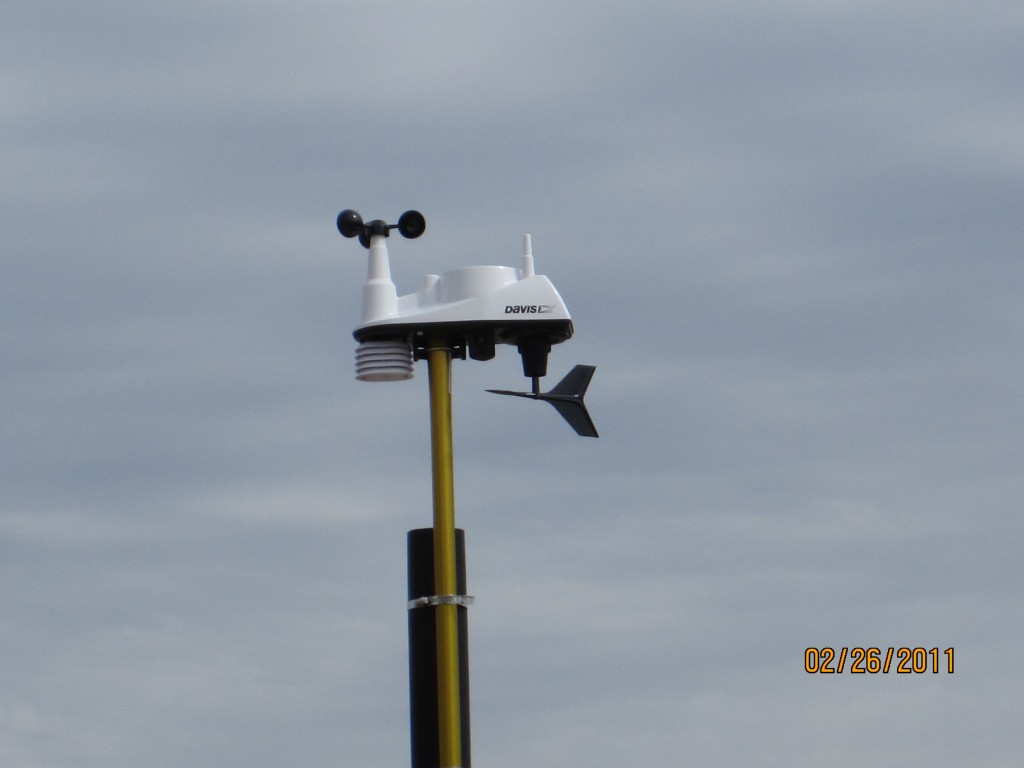
My station. We had an unused basketball pole and hoop next to the driveway. So I took down the hoop and used the pole to mount the station.
The sensor cluster sends data to the console over a wireless connection. Davis claims that the range is 1000 feet. My console is mounted about 100 feet from the sensor on the far side of the house and I have always had a reliable connection. The console gives you a read out on what the weather is like right now and what the trends are. But it is a fairly basic liquid crystal display that gives you the numbers, but not much else.
Davis sells an add on that lets you interface to the console and download the data to a computer. With Davis, this is about your only option. There are some people out there who have been able to build their own interface, but for us mortals, this is it. The up side is that the data logger does have some on-board storage. So if your computer crashes, the weather data will still get stored in the data logger until you get things running again.
The Computer
You can use just about any computer to monitor the weather station. It is not something that requires a lot of horse power. So if you have an older system sitting around, you can likely put it to work monitoring the weather station. The computer connects to the console through a USB port, or through a serial port. You have to know in advance which you are going to use and order the right data logger.
Today, I’m using a Raspberry Pi computer. This is a computer is designed and built in the UK with the hope that a small, inexpensive computer could be sold to schools to spark interest in computer science classes teaching programing and robotics. It remains to be seen if the computer will bring about a teaching revolution. But what it has done is create a great deal of interest in the computer hobby community. At only $35, people can afford to buy them to play around with and try out new ideas.
The computer runs a version of Linux that has been set up for the ARM processor and the hardware this tiny computer has on board.
The Software
I’ve run a number of different software packages and all of them do the basic job. They read the data from the console, store the data in a data base, create web pages, and upload them to a website and/or community websites like Weather Underground. Picking one is really a matter of choice based on what operating system you are running. Weather Underground keeps a list of what is available HERE.
I settled on weewx because I wanted to run Linux and I wanted to use the Raspberry Pi. Weewx was easy to set up and it ran on the Raspberry, so it was that simple.
After that, all you need is a website to upload the data to. Or you can just sign up with weather underground for free and they will take your data uploads.
Well, I was never able to resolve my issue with Century Link. But after a week of trouble shooting, its not all their fault. I was able to register another domain on another server and able to ftp into it.
So the new site for weather is www.nevidweather.net
Ever since I learned that you could run the Mac OS X on a home built system, I have wanted to do it. I’ve built a bunch of Windows based computers, but building a Hachintosh is a bit harder because you have to play close attention to the parts you buy and loading up the OS is a bit harder. Because Apple updates their product lines about once a year, most of the parts are not real bleeding edge items. This makes them a bit cheaper than the really new stuff. But it also means that it can be a challenge to find the right parts because sometimes the most compatible parts have gone out of production and newer stuff does not work as well.
So after a few months or reading and pondering over just what I wanted to get, I was ready to use the Amazon gift cards I got for my birthday and get started. Thanks to my wife and mother-in-law for the gift cards. My mom gave me some cash and that went towards the case and other parts at Fry’s.
I picked out this case at Fry’s:
The case is all black. Black fittings with black screws and black wires. Its a bit hard to work on. It soaks up the light.
I installed the motherboard:
That adds a bit of color. It’s very well labeled and laid out. I guess this is what you get when you buy something that is better than the on sale board at Fry’s.
Next I put on the processor:
Then the processor fan to keep it all cool.
Some memory:
And the video card;
And that is where things are now. I still need to connect the wires, put in the hard drive and the DVD drive. Then it will be time to power it up and start the install process.
Yep. Another re-design
Another site re-design. This time with a WordPress. I have been toying with a blog for a while and this seems easier to do with the WordPress package than it was in Joomla.
The weather site is up and can be reached by the menu at the top.
I’m thinking of maybe doing a blog and maybe a forum for the people I play World of Warcraft with.
Right now there is no advantage to signing up as a member on the website. It does not give you an e-mail address or anything else. Yet
E-Mail Info
Most people just use the site for e-mail. So all the e-mail information is below.
The pop server is
pop.nevid.net, the outgoing server is smpt.nevid.net.
If you are using Outlook or any other mail program you have to use your full e-mail address as the username.
( username@nevid.net).
Web Mail
Web mail is here: http://webmail.nevid.net
You will have to enter the whole e-mail address in user name slot and then your password.
Ok just clieck the e-mail menu item right under the image.